How to Fix Can’t Connect To This Network Error?

One of the most common problems most Windows 10 users face is when they can’t connect the PC with a network. Well, this is very normal. If you are facing this issue often, don’t have to be scared. We have various solutions to fix the ‘Windows Can’t Connect To This Network’ issue.
To fix this problem, you have to follow some simple methods. That’s why we are sharing some best methods in this article. By applying them, you can solve this issue. So, make sure you are reading the article carefully till the end. Let’s find out.
What is Windows Can’t Connect to this Network Error?
If you don’t know why this issue occurs, we can explain this. As we mentioned above, there are several reasons to have this error. In most cases, it can occur when your computer has an outdated driver or infected files. However, it can also occur when your device has some buggy updates.
[Read more: How to Turn Off iPhone 13, 12 | iPhone Latest Models?]
How to Fix the Can’t Connect to this Network Error?

Now, you know why you are seeing the ‘Windows Can’t Connect to This Network’ issue. The good thing is, you can fix it by following some steps. It takes a couple of minutes to fix this problem. In the following, we are sharing the best fifteen methods to resolve this issue:
Method 1: Forget Network
When you make some changes in the settings, the system won’t let you connect to the network. In this case, you have to forget the network to fix the issue:
- Locate and select the ‘Network & Internet’ option from Settings
- Select ‘Wi-Fi’ and then the ‘Manage known networks’ option
- Click on ‘Forget’
Method 2: Enable/Disable Airplane Mode
If you are having issues with the network, you can enable and disable the airplane mode. Well, you can solve it easily. The easiest way to enable and disable airplane mode is by using the F12 key on your keyboard. On the other hand, you can also do it from the taskbar.
Method 3: Uninstall Network Adapter Driver
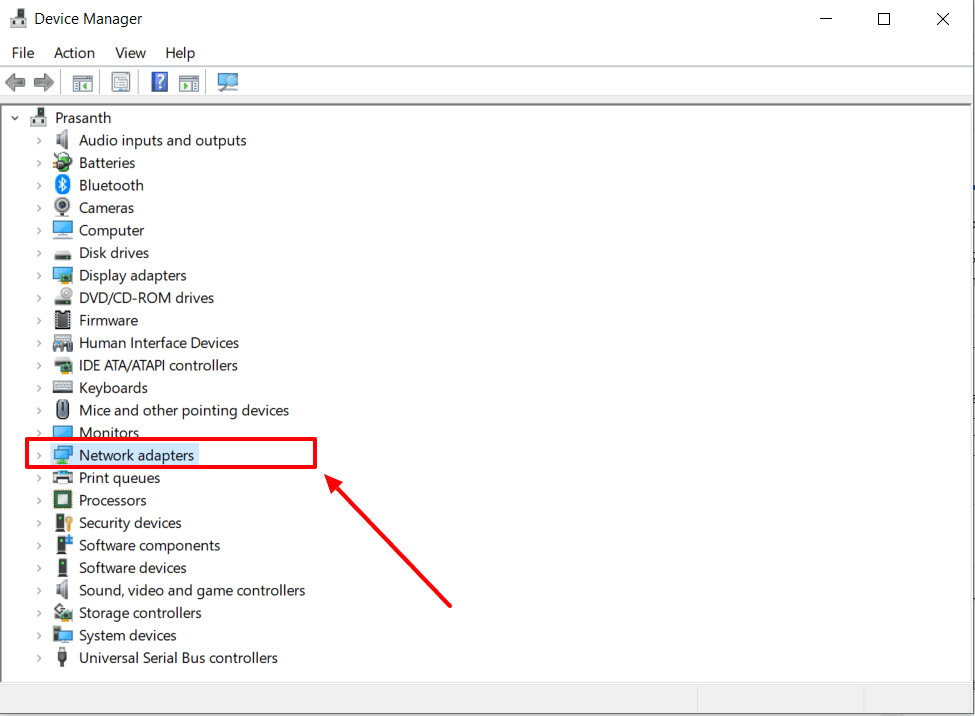
Another good method to fix this error is uninstalling the network adapter driver. To do this task, you have to follow these below steps:
- Press Win + X together and select ‘Device Manager’
- Right-click and select ‘Network adapters’.
- Then, you have to select the ‘Uninstall device’ option
Method 4: Flush DNS and Renew/Reset IP
Flushing DNS and reset IP is a good method to fix the ‘Windows Can’t Connect To This Network’ error. When you are doing this, it will flush the DNS cache from your Windows 10 device. However, you have to follow the proper process in this case.
[Read more: How to Fix sedsvc.exe Issue in Windows 10? ]
Method 5: Reset Network
Many people prefer resetting the network when it comes to fixing this issue. You have to follow these steps:
- Select the ‘Network & Internet’ option and click on the ‘Status’ option
- Now, select ‘Network reset’ and then the ‘Reset now’ option
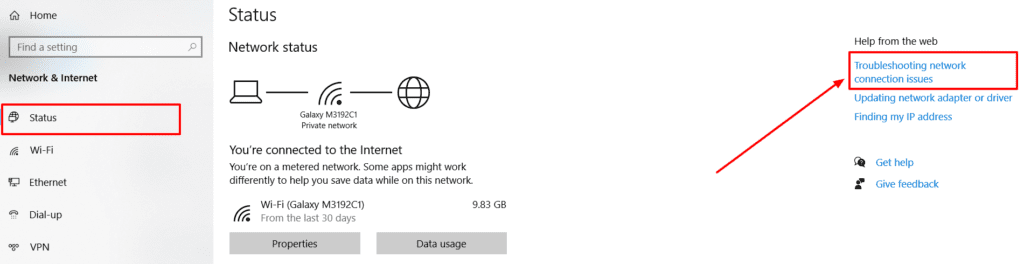
Method 6: Run Network Troubleshooter
You might know that Windows 10 has a feature called Network Troubleshooter. Well, it’s very useful for fixing this issue. Here, you have to follow these below steps:
- Select the ‘Network & Internet’ from the Settings menu
- Locate ‘Status’ and select.
- You can find ‘Network troubleshooter’ there, click on it
Method 7: Run Network Adapter Troubleshooter
You can also resolve this problem by running a network adapter troubleshooter. To start this process, you have to do this:
- Select the ‘Update & security’ option from Settings
- Next, select ‘Troubleshoot’ and then ‘Network Adapter’
- Then, you have to select the ‘Run the troubleshooter’ option
Method 8: Add a Connection Manually
Well, there is a feature in Windows 10 where you can add a connection manually. To do this, you have to the following process:
- Select ‘Network and Internet’ from the control panel
- Then, you have to select the ‘Network and Sharing Center’ option
- Next, you have to select ‘Set up a connection or network’ from the dialog box
- Another dialog box will appear, select ‘Manually connect to a wireless network’ and then ‘Next’
- Enter required credentials and select ‘Next’
[Read more: How to Install Spectrum TV App on Firestick?]
Method 9: Disable IPv6
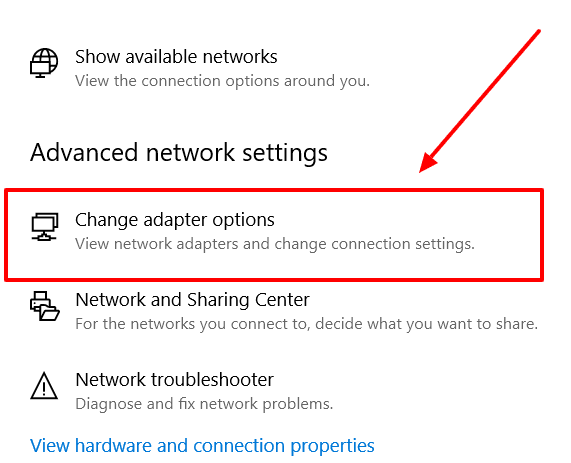
Another good way to solve this problem is disabling IPv6. You have to do these things:
- First, you have to right-click on Wi-Fi and ‘Open Network and Sharing Center’
- Then, select ‘Change adapter settings’ from the open window
- Right-click to select ‘Properties’
- Then, uncheck ‘Internet Protocol Version 6 (TCP/IPv6)’ and select ‘Ok’
Method 10: Make Sure Windows and Adapter Are Using Same Security Type
If you don’t want any network issue on your device, make sure the security feature and security type are the same.
- First, open ‘Network and Sharing Center’ and select Wi-Fi
- Select ‘Wireless Properties’
- Then, select the security type and click on the ‘Ok’ button
[Read more: What is chrome://flags/#enable-ntp-remote-suggestions?]
Method 11: Change Wireless Network Mode
You can also change wireless network mode. To complete this process, you can follow these below steps:
- You have to select ‘Network and Sharing Center’ and then ‘Change adapter settings’
- Right-click on the network and select ‘Properties’
- Then, select ‘Configure’ and ‘Advanced’
- You have to select ‘802.11b/g’ and then ‘OK’
Method 12: Disable/Enable NIC
Another way to fix this issue is by disabling and enabling NIC. To do this, you have to follow this process:
- Press Win + R from your keyboard and select ‘ncpa.cpl’, select ‘Ok’
- Right-click on your network and select ‘Disable’
- Then, enable the option
Method 13: Change Channel Width for Your Network Adapter
You can also solve the issue by changing the channel width for your network adapter. Make sure you are following this:
- After right-clicking on the Wi-Fi option, select ‘Open Network and Sharing Center’
- Then, select ‘Change adapter settings’ from the window
- Click on ‘Properties’ and then ‘Configure’
- Select ‘Advanced”>”802.11n Channel Width for 2.4GHz”>”20MHz only’ and click ‘OK’
Method 14: Change Power Options
To change the power option, you have to follow these steps:
- Select ‘Power & Sleep settings’
- Then, open ‘Additional power settings’ and select ‘Change plan settings’
- Next, you have to select ‘Change advanced power settings’ from the window
Method 15: Run Commands in CMD to Fix the Issue
Last but not least, you can fix this issue by running commands in CMD. You have to do this:
- Select ‘Run as administrator’ from Command prompt
- You have to type the following Command prompt
netsh winsock reset
netsh int ip reset
ipconfig /release
ipconfig /renew
ipconfig /flushdns
- Restart your PC to fix the problem.
Method 16: Check for Windows Updates and Install
Software defects could very likely be the source of this network issue. Fortunately, Windows publishes updates on a regular basis that fix these and other bugs. That’s why it’s a good idea to make sure you’ve installed the most recent Windows Update. Here’s how to go about it:
- Open Settings Option and Click on Update & Security
- To discover the most recent software, go to “Check for updates.”
- To install the update, select “Download and install.”
Method 17: Try to Update Network Adapter Driver
If reinstallation fails, you can update the driver by following the procedures below:
- Select the Windows button and “R” Simultaneously to open Run.
- Type “devmgmt.msc” and click enter for Opening Device Manager
- To access the drop-down menu, select “Network adapters.” Also, write down the full name of the network adapter driver for future reference.
- Select “Update driver” from the context menu when you right-click on your Wi-Fi driver.
- Click “Search automatically for drivers” and try to follow the on-screen instructions.
Conclusion
Errors are the most inconvenient things to deal with while working on a computer system since they reduce productivity. As a result, you must learn how to deal with and correct errors.
All of the potential remedies for folks experiencing the “can’t connect to this network” issue are given below. Hopefully, you were able to use one of these options. If they didn’t, the issue is almost certainly with your internet provider, whom you should contact.