How to Fix sedsvc.exe Issue in Windows 10?
Windows 10 is one of the most upgraded operating systems by Microsoft. However, Win 10 users often face several issues. In this case, sedsvc.exe is a common error in Windows 10. Well, sedsvc.exe is an executable exe file that enters your computer when you are updating Windows.
Well, many people think it’s a virus or malware. If you have been thinking about it, we are here to help you. sedsvc.exe is very common and it does not affect your PC in that way. In this article, we are covering what this file is and how to fix it. Hence, we are also sharing how to remove it permanently. Make sure you are reading each step before implementing. So, let’s get started.
What is sedsvc.exe?
Before we learn about the methods to fix sedsvc.exe, we have to know the basics. As we noted above, this is an executable exe file that comes along with the Microsoft Operating System. One can see the file after an update.
On the other hand, you have to be careful while deleting this file when it’s important for your PC. If there’s a virus or malware in the sedsvc process, it will run in the background. Well, you can have this issue in various Win OS such as Windows 7, Windows 8, Windows XP, and Windows 10.
[Read more: What Is Content://com.avast.android.mobilesecurity/temporarynotifications?]
What is Sedlauncher.exe?
There’s another similar file to sedsvc.exe named sedlauncher.exe. According to some experts, this file is more harmful to the PC. However, they are very similar as they work in the same way as sedsvc. Hence, this file can enter your computer after a Windows update.
Is sedsvc.exe Safe to Run? Is it a Virus or Malware?
So, is sedsvc.exe is a virus file? Is it safe to run? To get the answer, you have to check the location of this file. Go to the Task Manager and click on the columns section. If the Verified Signer of sedsvc.exe value says that it’s ‘Unable to verify’, then it could be a virus file.
The Best Ways to Fix Sedsvc Problems
The most important need for avoiding sedsvc issues is a tidy and clean computer. This entails conducting a virus check, using 1cleanmgr and 2sfc /scannow to clean your hard drive, 3uninstalling unnecessary programmes, looking for Autostart programmes (using 4msconfig), and turning on Windows’ 5Automatic Update. Never forget to create regular backups, or at the very least, to create restoration points.
In the event that you actually run into a problem, try to remember what you last installed or did before the issue first surfaced. To find the processes that are causing your issue, use the 6resmon command. You are better off correcting your installation or, in the case of more severe issues, reinstalling Windows.
Using the 7DISM.exe /Online /Cleanup-image /Restorehealth command on Windows 8 and later versions. This enables operating system repair without erasing data.
All active Windows jobs, including embedded covert processes like keyboard and browser monitoring or Autostart entries, are seen in the Security Task Manager. The possibility that a process is possible spyware, malware, or a Trojan depends on the security risk assessment. Keyloggers, malware, spyware, Trojans, spyware, and trackers that are dormant on your computer’s hard drive are discovered and eliminated by BMalwarebytes Anti-Malware.
How to Fix Common Sedsvc Issues?
Now, you know what is sedsvc.exe and how harmful it can be for your PC. An extension file is used as a malware delivery system. Well, the installed original folder is called REMPL. If the folder is named REMPL V2, it didn’t come from Windows. That means, this can be a virus.
Well, if the file is located in the C:\Windows or C:\Windows\System32 folder, you have to start scanning it. If the file is malware, you need to follow some steps. Let’s find out how to fix it in the following:
Method 1: Uninstall the Feature
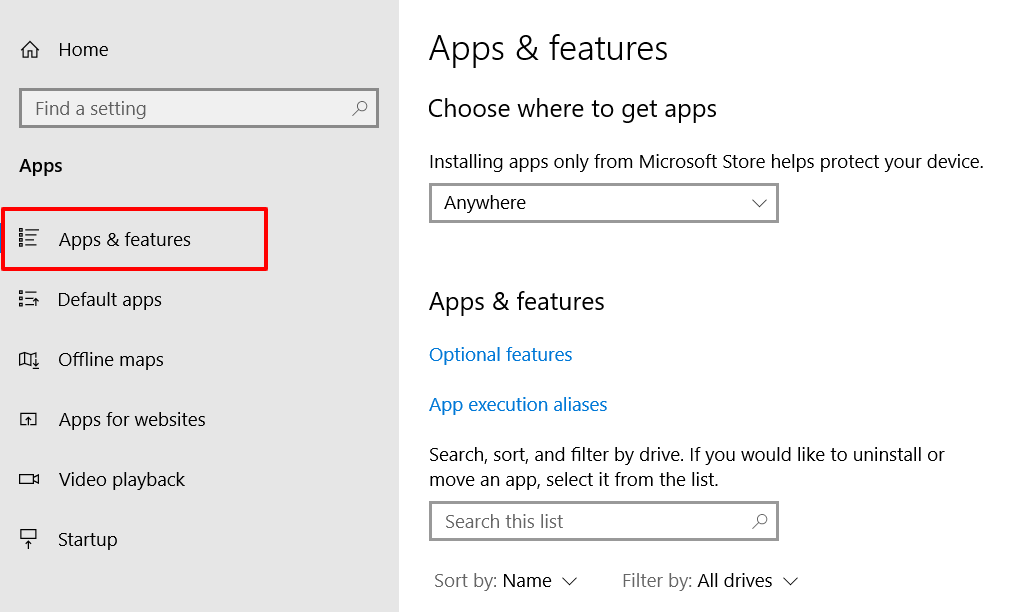
- Go to the Start Menu and open the ‘Settings’ option
- Locate ‘Apps’ and click on it
- Click on the ‘Apps and Features’ option
- Find the ‘Windows Setup Remediation’ option
- You will find two features under this option, click on the ‘Windows Setup Remediations (x64) (KB4023057)’
- Find the ‘Uninstall’ box and click on it
- Wait until the uninstallation process is done
This is the easiest way to fix the sedsvc.exe issue in Windows 10.
Method 2: Disable the Feature
On the other hand, If you don’t want to delete your computer’s sedsvc file permanently, there is another option. you can also disable the file from your computer. To implement this method, you need to follow this:
- Find the service manager option from the Start menu
- Locate Windows Remediation Service there, double-click on that option to open properties
- Click on the ‘Stop’ option
- You will see a dropbox, there change the startup type to ‘Disable’
[Read more: What is content://com.android.browser.home/?]
Method 3: Update Windows
An out-of-date Windows operating system is the most common cause of sedsvc.exe error messages. To start Windows Update, please follow these simple steps:
- Press the Windows Start button to get started.
- In the search box, type the word “update” and click on “ENTER.”
- In the Windows Update dialogue box, click “Check for Updates” (or a similar button depending on your Windows version).
- Click “Install Updates” if you find any updates are available for download.
- After the update is finished, restart your computer.
Step 3: An out-of-date Windows operating system is the most common cause of sedsvc.exe error messages. To start Windows Update, please follow these simple steps:
Press the Windows Start button to get started.
In the search box, type the word “update” and click on “ENTER.”
In the Windows Update dialogue box, click “Check for Updates” (or a similar button depending on your Windows version).
Click “Install Updates” if you find any updates are available for download.
After the update is finished, restart your computer.
Method 4: Download and Replace Your sedsvc.exe File
If none of the previous methods have resolved your issue, you can try a more aggressive approach by downloading and replacing it with an appropriate sedsvc.exe file version. Please follow the steps below to download and properly replace your file:
- Locate your Windows operating system version in the list of below “Download sedsvc.exe Files”.
- Click the appropriate “Download Now” button and download your Windows file version.
- Copy this file to the appropriate Trillian folder location:
- Windows 10: C:\Program Files\rempl\
- Restart your computer.
How to Remove Sedsvc.exe Process Permanently?
Now, you know how to fix the sedsvc.exe issue in Windows 10. If you want to remove this process permanently from your PC, you can implement three methods. We are sharing these three methods in the following:
1. Disabling via Task Manager
Disabling sedsvc.exe via Task Manager is the easiest way. Hence, it can remove the process permanently:
- Go to the startup taskbar and right-click on the Windows icon
- Press Ctrl + Alt + Del, it will open Task Manager
- Locate Windows Remediation Service
- Select the file and right-click, then select ‘End Task’
- After that, restart your PC.
2. Turn off Using Utility Service
You can also turn off this process by using a utility service. Here, find out how to complete this process:
- Press Windows + R to open a dialogue box.
- Type services.msc on that Run dialogue box
- Search for the Windows Remediation Service program and right-click on it
- Go to the general tab and click the ‘Disabled’ option
- Then click OK and Apply to complete the process
[Read more: How to Use File:///sdcard/ to Move or Copy Files on SD Card?]
3. Perform a System Restore
Last but not least, you can also fix the sedsvc.exe issue by performing a system restore. Many people implement this method to remove the process permanently from your computer. Let’s find out:
- Press Windows + S to open a search box and type Restore there
- Then, you have to select the ‘Create the restore point’
- Click the ‘System Restore’ option
- Click Next
- Then, select ‘Next’ and it will process System Restore
Conclusion
Finally, you know how to fix the sedsvc.exe issue in Windows 10. We have shared the two best methods to fix this issue. On the other hand, we have also shared how to remove the sedsvc.exe process permanently. These methods can solve your problem. For more information, you can collect various information to research on the internet.
FAQs
Q. How do I stop the sedsvc.exe process?
Ans. The easiest way to stop the sedsvc.exe process is by Run. You can also stop this process from Task Manager.
Q. How do I start the sedsvc.exe process?
Ans. When you are disabling sedsvc.exe from your PC, you can also enable it. However, you can’t enable it when you are removing this process permanently from your computer.
Q. How to Prevent High Disk Usage by ‘SedLauncher’?
Ans. To prevent high disk usage by ‘SedLauncher’, type ‘askschd.msc’ on the Run box. Go to Task Scheduler > Task Scheduler Library > Microsoft > Windows > rempl. Then, right-click on Shell and select the ‘Disable’ option.